Bootstrap Header Code
Overview
As within printed documents the header is just one of the highly crucial parts of the web pages we receive and create to apply every day. It safely keeps one of the most important information relating to the identification of the organization as well as people responsible for the page in itself and the essence of the whole internet site-- its navigation system which in turn together with the Bootstrap Header Class itself should really be thought and made in this type of way that a site visitor in a rush or not actually knowing in which way to head to merely take a view at plus get the wanted info. This is the best case-- in the real world getting as near as achievable to this appeal and behavior likewise goes on given that we almost every moment have some project specified limitations to think about. In addition compared to the written paperworks in the world of net we should always remember the diversity of attainable gadgets on which our webpages could potentially get presented-- we ought to assure their responsive behavior or in other words-- ensure they will display top at any monitor size achievable.
And so let's look and check out just how a navbar gets developed in Bootstrap 4. ( read this)
Efficient ways to apply the Bootstrap Header Class:
Initially to make a webpage header or since it gets pertained to in the framework-- a navbar-- we ought to wrap the entire item in a
<nav>.navbar.navbar-toggleable- ~ screen size ~.bg-*.navbar-light.navbar-lightWithin this parent component we have to begin by positioning a button feature that will be operated to display the collapsed web content on a smaller screen dimensions-- to complete that make a
<button>.navbar-toggler.navbar-toggler-left.navbar-toggler-righttype = " button "data-toggle ="collapse"data-target = " ~ the collapse element ID ~What is actually bright fresh for latest alpha 6 release of the Bootstrap 4 framework is that within the
.navbar-togler<span>.navbar-toggler-icon<a>.navbar-brand<div class="img"><img></div>Now-- the crucial component-- designing the collapsible container for the fundamental site navigating-- to do it make an element utilizing the
.collapse.navbar-collapseid =" ~ same as navbar toggler data-target ~ ".collapse<ul>.navbar-nav<ul><li>.nav-item<a>.nav-link.nav-item.nav-link.nav-item.dropdown<li>.dropdown-toggle.nav-link.nav-item<div>.dropdown-menu.dropdown-itemSome example of menu headers
Incorporate a header to label sections of activities into any dropdown menu.
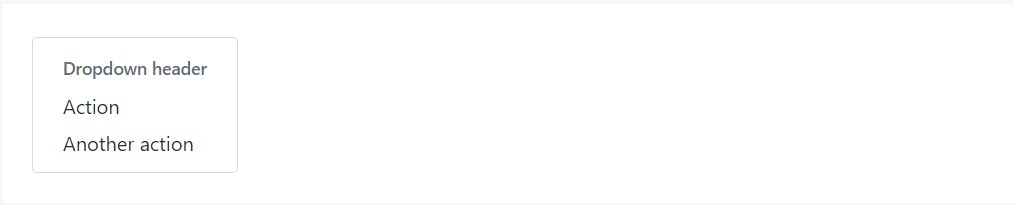
<div class="dropdown-menu">
  <h6 class="dropdown-header">Dropdown header</h6>
  <a class="dropdown-item" href="#">Action</a>
  <a class="dropdown-item" href="#">Another action</a>
</div>
Even more features
Yet another new item for this edition is the option to include an inline forms in your
.navbar.form-inline<span>.navbar-textFinal thoughts
As soon as it comes to the header elements in recent Bootstrap 4 version this is being really taken care of with the integrated in Collapse plugin and a number of navigation certain material classes-- a few of them designed particularly for preventing your product's identity and various other-- to earn certain the real page navigating system will display best collapsing in a mobile phone design menu when a pointed out viewport width is achieved.
Examine several online video guide relating to Bootstrap Header
Connected topics:
Bootstrap Header: main documentation

Bootstrap Header information
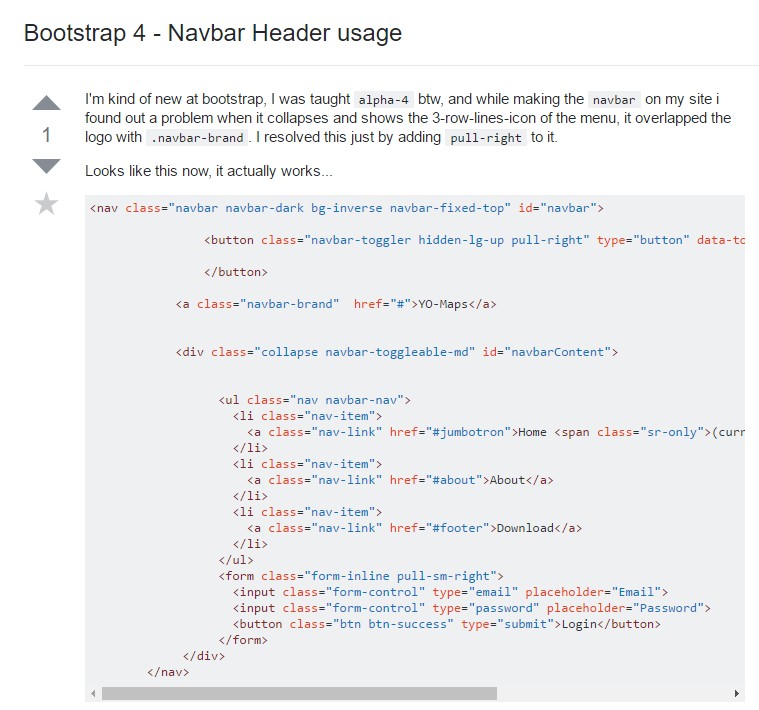
Bootstrap 4 - Navbar Header usage